My batch of STM32F103C devices arrived yesterday so I set about playing with them to see what magic we could create for building interfaces to Zynthian. (@freeKey and @wyleu know what I mean . ) So here we go…
If you buy Blue Pill (or similar) STM32F1 modules like these they will often be delivered without a USB bootloader. This was the case for me so we have to use the DFU (builtin bootloader) to flash with serial port. This requires a TTL serial port on the development PC like this. This involves using an application to push firmware (or bootloader) to the STM32 whilst it is in DFU mode via a serial port. I am currently on a Windows laptop so used Flash Loader Demo which is available direct from ST (requiring free account) or other places on web host it.
Connect USB UART GND to STM32 GND
Connect USB UART 3.3V to STM32 3.3V
Connect USB UART Rx to STM32 A9
Connect USB UART Tx to STM32 A10
Set BOOT0 jumper
Connect USB UART to PC
Start “Flash Loader Demo”
Select USB UART port, 115200, Next
“Target is readable. Please click “Next” to proceed”, Next
Select correct Target, Next
Select “Download to device”, “Download from file”, @8000000, Next
Clear BOOT0 jumper
The file to download depends on use case. I first tried to get MIOS bootloader working but it doesn’t which is disappointing. (I can flash the bootloader firmware but the STM USB interface is subsequently not recognised by Windows or Linux.) So I went back to a previous idea and used the bootloader for KiKGen.
After this I then had a STM module that can be flashed with Arduino IDE using HID Bootloader 2.0 upload method. I selected “Generic STM32F103C Series” device and uploaded Blink example.
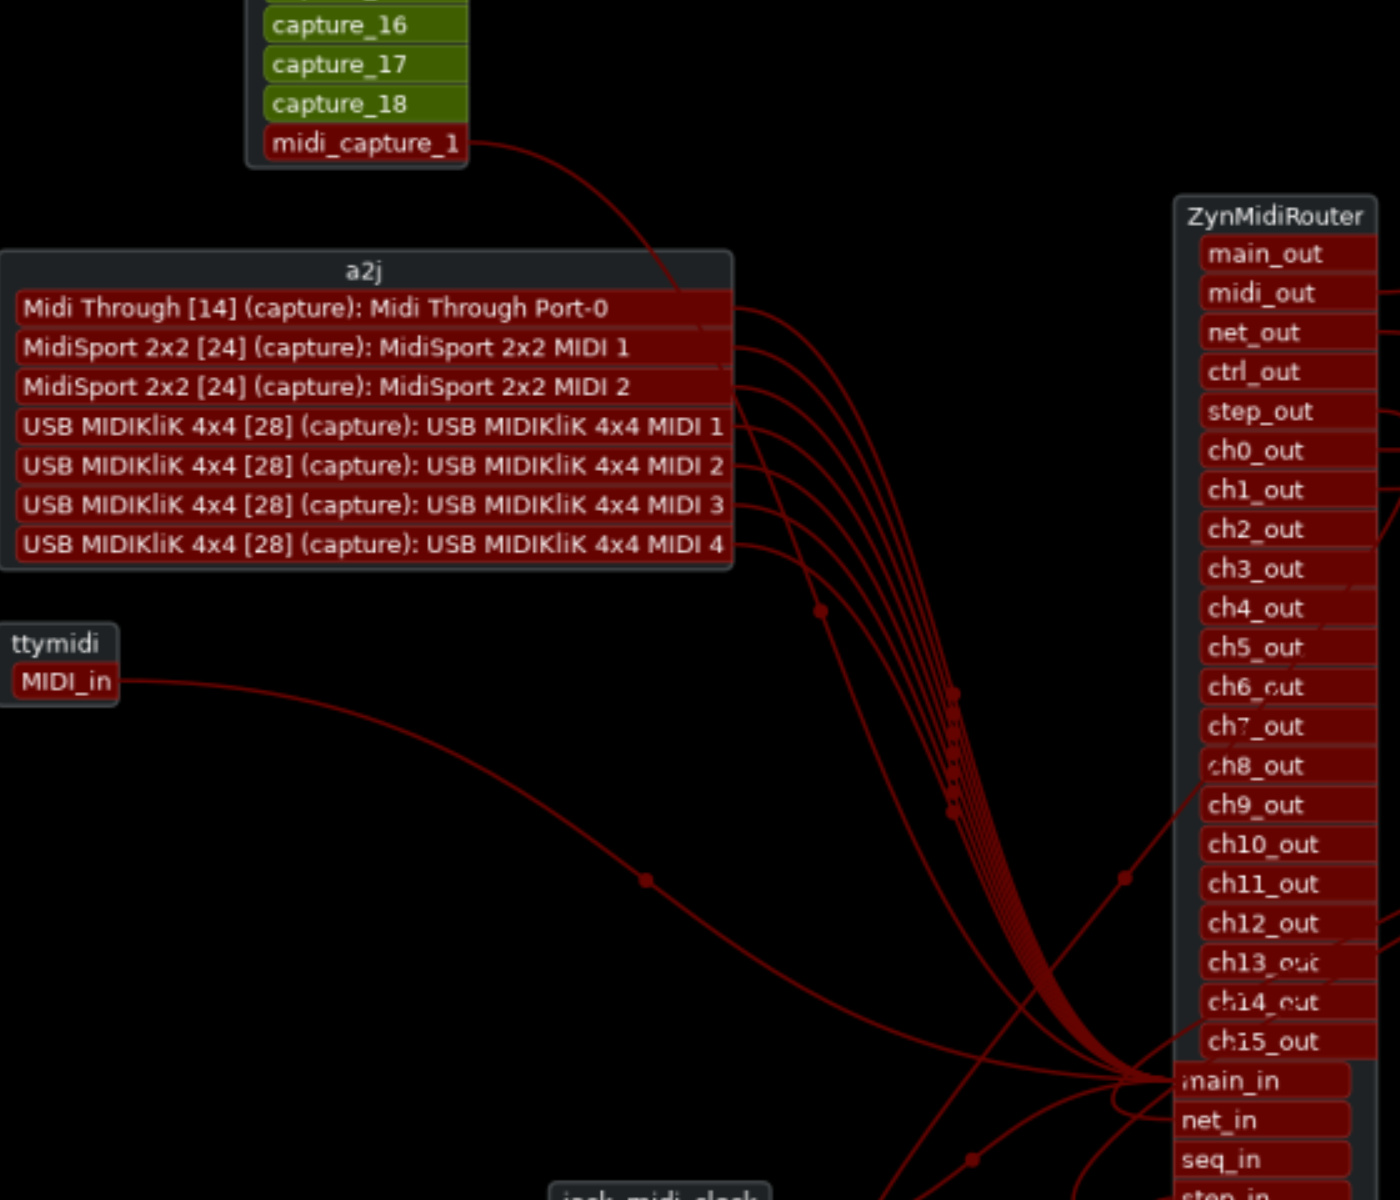
Next I uploaded the KiKGen USB MIDI KliK4x4 firmware, plugged into Zynthian and this is what I saw in Patchage:
@opus.quatre - Sorry - I hit some key combination which saved before I was ready.
@C0d3man - I use these when I need a lot of i/o. They are dirt cheap (I got three delivered within a few days for £11 - can be cheaper if I want to wait a month) and very flexible. They are pretty powerful so can do quite a lot. The example above shows they can do 3 x 3 physical MIDI i/o plus 16 x 16 virtual MIDI with processing, routing, etc. as well as interfacing to other kit. KikGen firmware allows up to 5 modules to be daisy chained to give 15 physical MIDI i/o with associated routing which I want to do as an external MIDI patchbay and USB interface to the Zynthian. I intend to adjust the code to allow the flexibility I want.
@freeKey and I are also doing something similar to @wyleu with switches and MIDI program change.
I opened this Topic to continue what was mentioned elsewhere so that my trials and tribulations can be followed or ignored as appropriate.
Indeed - they run MIOS which is what I first tried to get running but am struggling with the bootloader which does not seem to work on the modules I have. I hope to find some time to compile the bootloader from source. The precompiled versions are for a slightly different STM32F1 which might be why it isn’t working. MIOS looks really cool. It can be updated with sysex so new firmware can be applied using MIDI only. It has lots of functions including rotary encoders, switches, MIDI, etc. I really want to get that working.
This time I found I needed to reset the STM32 whilst Arduino IDE was trying to upload. (I thought it managed without a reset previously.) I don’t currently see an advantage of 16 (or even 4) USB MIDI devices within ALSA / JACK. There can be lots (up to 15) of physical MIDI inputs which can be routed and processed within the device before hitting (or not hitting) the USB interfaces. In Zynthian we (currently) route them all to the same Zynthian MIDI input anyway so in this use case* we only really need one USB MIDI port.
*I need to keep the use case relevant to Zynthian to avoid being evicted from this forum. There is only so much tolerance one can expect from the all powerful @jofemodo.
[Edit] And taking it down to one port also works which I might keep (although extra ports might be useful when plugged into other (non-Zynthian) devices). This time I could upload firmware without restarting but the LEDs were flashing differently so I need to better understand the modes that KikGen uses.
Derive a simple sketch from example !USBComposite for STM32F1" -> “midiout”
Note: Don’t install the standard Arduino STM32 boards as these don’t work as well as Roger’s.
I created a GPI to USB MIDI Program Change interface where grounding PB12…PB15 triggers Program Change 0(1)…3(4) on MIDI channel 1 to be sent to the USB host (Zynthian). This is far too simple, not including switch debounce, channel and preset configuration, indication of current selection, etc. but it is a start and these few lines of code work. (Switch debounce not required for this example because you can’t resend same program change as previously sent but that isn’t what we ultimately want.)
I have created a GitHub repository for @freekey’s program changer project. Currently there is a readme that has much of the above info and the very basic firmware (slightly enhanced to provision for future development). I won’t post here on insignificant progress of that project but will let you know of significant development and other forays into the fun world of STM32 developments. This is a cheap and (relatively) easy way to build quite complex and powerful peripherals.
I have observed that the HID bootloader from KikGen is a bit… temperamental. It seldom automatically starts on demand and it can be tricky to catch it right during reset. I often have to set BOOT1 jumper to force it to perpetual bootloader mode, flash firmware then clear BOOT1 jumper. I may install a more robust bootloader, e.g. LeafLabs MapleLeaf. I know that it is easier to have more complex bootloaders when using Linux hosts because it supports multiple interfaces on same USB device but I am currently tied to a Windows laptop for development (don’t ask!) so need to use a bootloader that will work reliably with that.
I have revisited this topic in recent weeks. I have detailed how I used PlatformIO as a build platform. I had wanted to use USBMidiKliK4x4 to expand my USB/MIDI interfaces, driven by the need to convert devices that send only on MIDI channel 1 to present on other MIDI channels but initially had difficulty getting it to compile. So I wrote a firmware that did just this: present 3 USB-MIDI ports with each being transformed to the relevant MIDI channel. I have subsequently managed to get USBMidiKliK4x4 working by porting it to build on PlatformIO. I forked the upstream project then created a branch that made the changes to build. I also allowed more control of the build using build options, e.g. the quantity of “cables” presented on the USB MIDI interface. Contrary to what I previously wrote - it does make sense to have as many USB MIDI cables as there are physical MIDI ports. This allows a one-to-one mapping and hence for each physical MIDI port to appear as an individual USB MIDI port (cable). Each STM32 module supports 3 hardware MIDI ports and you can daisy-chain up to 5 modules for a maximum of 15x15. I have built a 9x9 interface on a 1U panel that should be sufficient for the quantity of 5-pin DIN MIDI devices I have. (It is less important in these days of USB MIDI but I have some legacy kit.) The STM32F103C8 continues to be a versatile and low cost device. I was tempted to do this with the Rapberry Pi Pico but it had fewer UARTS (and software serial doesn’t work for this purpose due to its high resource usage). I will probably add some volts to the spare pins on one of the MIDI inputs to allow powering my WX-11 with a direct, single MIDI cable (removing the need for the BT7 interface box which is basically just a battery pack.
I updated this post because we talked about this in Zynth Club recently and I promised to publish the USB MIDI interface I had built but this is better. Kudos to TheKikGen (the upstream author of USBMidiKliK4x4). I am not yet sure how I might be able to contribute my changes upstream as they change the file locations making it difficult to merge but will think about it…
There is a web based configuration tool for this but it is a pig to get working (node-js based thing) so I may write a Python configuration tool similar to the thing I did for the nanoKontrol. It can all be configured via MIDI SysEx (although the author is not a paid-up member of the MIDI Organisation so uses unauthorised manufacturer ID).
There is some fantastic stuff done with the Teensy. I have tended to shy away from it because of its cost. Although a very good value and powerful board, I tend to go for the much cheaper Chinese clone development boards, e.g. Teensy 4.1 cost £34 but Bluepill cost £2. Even if I need 3 Bluepills it is still 1/6 the price of a Teensy 4.1. Of course I have a lot of experience with embedded development so I can get these cheap boards to do what I want. What Deft does is beautiful and allows the more casual developer (as well as the experienced) to create great stuff fairly quickly and time is money…
I have a Pico on order so will soon be able to play. I have lots of STM32F103 and use the many IO (for other projects) including lots of ADC which the Pico does not have. We may find the same issue with bit-banging Serial on the Pico that I found on the STM32 - that it occupies too much time and cannot do other stuff and fails very quickly.
 . ) So here we go…