Zynthian Pocket

Some months ago had the idea of building a Zynthian for my purse/bag/backpack that I can easily take with me on vacation. This together with a QuNexus and a power bank and headphones makes a good toy for in-flight entertainment and spontaneous improvisation/jam sessions when connected to a local PA.

So here it is, as small as 129 x 74 x 38 mm:

  • Pi5 8GB
  • homemade thermal block made from the cheapest possible armor case
  • u-bent aluminium tread plate as base and sides, providing enough cooling surface
  • 4x silicone rubber feet to protect tables and allow air convection
  • lasercut PLEXIGLAS® XT frame and knobs
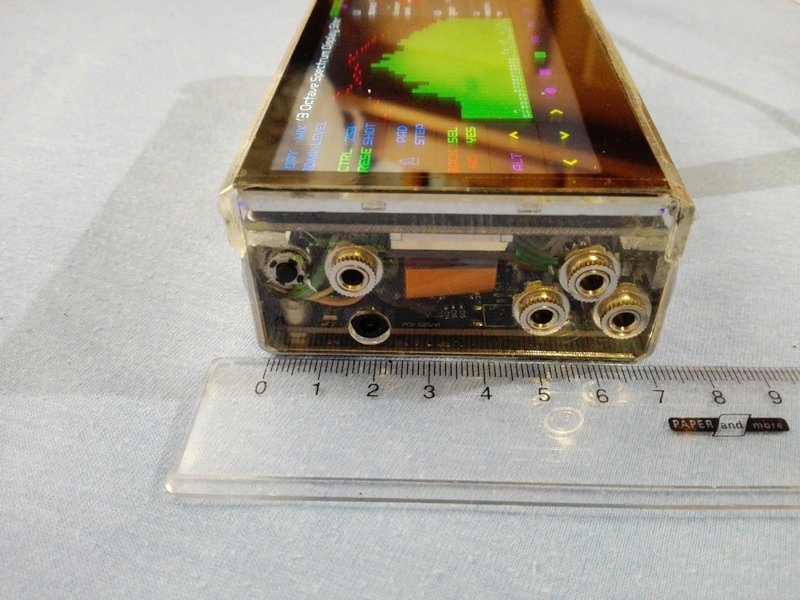
  • IQaudio Codec Zero (using headphone/line stereo out and combined mic/line stereo input, the black plastic TRS socket)
  • MIDI Trio: In-Thru-Out via standard TRS Type A (due to size, the triangle of 3.5mm TRS sockets)
  • 4.3″ DSI QLED Multi-Touch Display (Waveshare 24783)
  • 1x MCP23017
  • 4x EC11 encoders and many 10nF caps
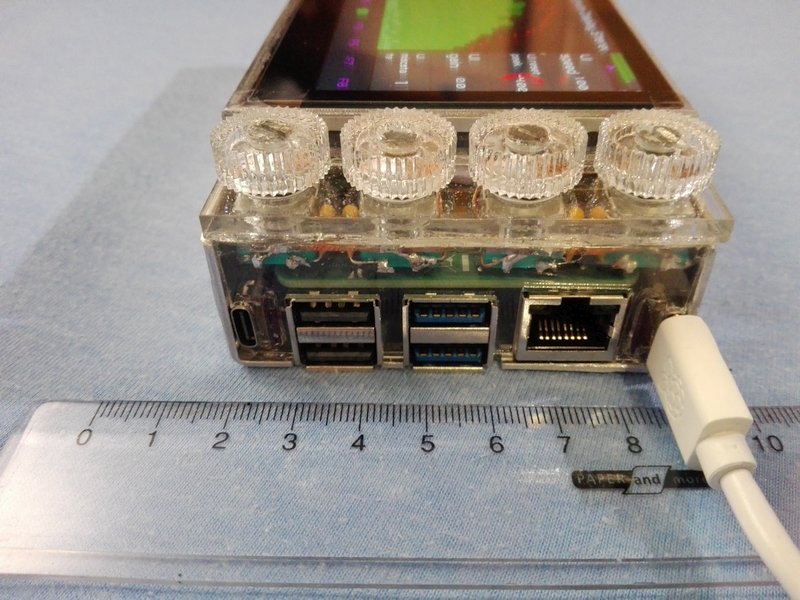
  • 1x USB-C power input (homemade PD trigger, negotiates always the best available voltage for stable 27W)
  • 1x wide-range input to 5.1V 6A supply (homemade)
  • 1x USB-C gadget mode connection
  • 1x power button (at the side next to stereo out)
  • 1x genuine (!) SanDisk Extreme Pro 64GB microSD


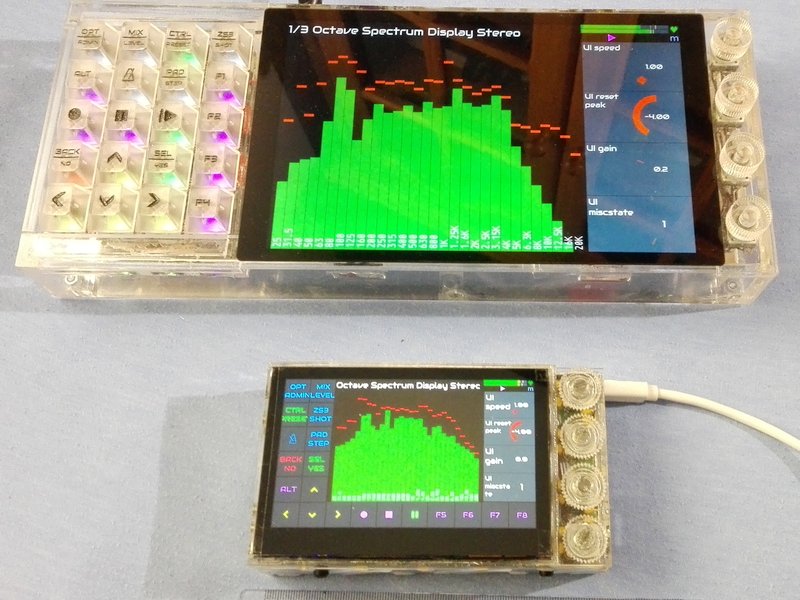
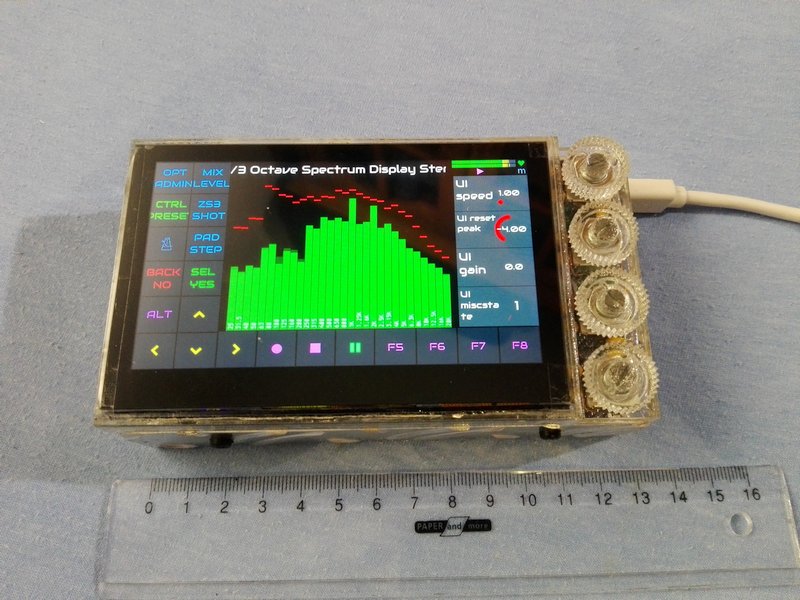
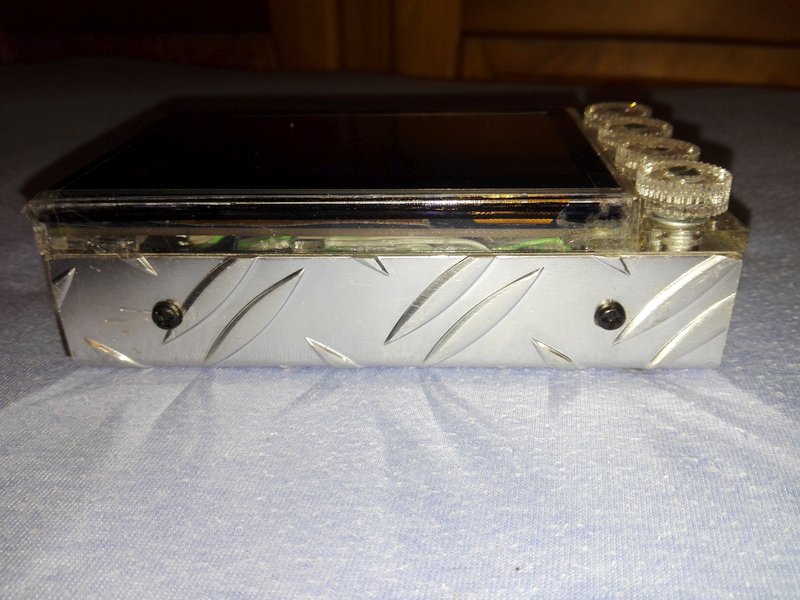
I wanted to have this thing as monolithic as possible. The knobs are barely higher than the display, but they are quite comfortable to work with thumb and finger.
Heat dissipation is just balanced enough to work perfectly under full load in environments up to 35°C when placed on a hard surface with the silicone feet to allow air to circulate underneath the base (and surface taking up some radiated heat as well). The tread makes the surface larger and acts like some sort of cooling fins, so it is just enough cooling for maximum performance with optimised chipset timings of the recent bootloader EEPROM but without overclocking (that does nothing good, anyway).

The EEPROM config via rpi-eeprom-config --edit is this:

[all]
BOOT_UART=0
BOOT_ORDER=0xf164
NET_INSTALL_AT_POWER_ON=0
NET_INSTALL_ENABLED=0
SDRAM_BANKLOW=1
USB_MSD_DISCOVER_TIMEOUT=1000
POWER_OFF_ON_HALT=1
PSU_MAX_CURRENT=5000

The boot order allows to boot from USB first, so I will likely never have to dismantle the entire device to reach the microSD card, because I can always boot a RPi OS from USB stick to reflash the Zynthian in case of a software/data failure. Unused things are disabled or set in a way to cause minimum boot delay.

The PSU_MAX_CURRENT=5000 is the most important setting to make the Zynthian run at full speed and full performance without a Raspberrypi 27W Original power supply and with custom power converter/supply circuit instead. Without this setting, the RPi 5 will run at throttled mode, if the bootloader can not negotiate the 5.1V at 5A from the USB-C power supply! I’ve built the power input in a way that it can take any USB-C PD voltage as long as it delivers the required current for 27W reliably.

The screen shows the touch keys to emulate the V5.x keypad, saving a lot of space.

I’ve used it during travel and it made quite some fun! The combined mic/line input is good enough to take a guitar signal directly and/or a dynamic mic for processing, or line in.

Many thanks to @jofemodo @wanthalf @riban @wyleu

For the one who wants to use an IQaudio Codec Zero (or the identical Pi-Codec) for a DIY Zynthian, I’ve added some extra files:
rc.local (479 Bytes)
stereo-mic.state (19.1 KB)
webconf-mixer-controls.txt (423 Bytes)
The rc.local is to make the card work at all, place the stereo-mic.state in the directory mentioned in rc.local. This enables the stereo mic feature of the codec and sets input to best quality and amplification versatility. Use the Webconf mixer controls to show all relevant features and omit the useless ones. Beware, on-off-logic is inverted due to some mysterious bug, so for example turning EQ off means it is actually turned on.

22 Likes

Beautiful! Is (are) there custom printed circuit board(s) for the MCP23017 and the encoders and the other modules or is it all hand wired?

1 Like

Nice job! How much does it weigh?

The brick as shown is 374 g.

1 Like

The PD trigger is a modded off-the-shelf module with an Arduino ATtiny85 patched on to do some extra measurements and configuration. The power regulator is a dremeled out part of another PCB I made years ago. Everything is hand-wired, as is the remote conection from the GPIO connector to the IQaudio Codec Zero.

I serously think about making a PCB for this, but I need to find the time first.

2 Likes

Brave @fussl !!

It’s one of the smaller zynthians i’ve seen. Really nice work!
I specially like the side-managed rotaries.

Congrats!

3 Likes

What a tidy package! Very nifty :slight_smile:

1 Like

Can I/we also get the same UI layout (including the touch buttons) on a normal V5.1?
I assume it is probably a UI config or python file.
My buttons are not always responding, therefore I now use an AKAI apc key25 mk2 which is great but not always practical.

Sorry for the late reaction (I’m now on holiday and didn’t have my discourse login on my phone)

You pocket really looks great!!

I was unable to get the Zynthian to boot from USB using a variant of the NVME boot procedure with what I thought were the proper changes. Can you share what you did to get the Zynth to boot from USB?
Thanks,
Harry

To make the Zynthian try to boot USB first, then NVMe, then MicroSD, you need to log into Webconf. Under System open Terminal, there write rpi-eeprom-config --edit, press the Enter/Return key.
Move the cursor to the line under the line [all] and add a new line written like this: BOOT_ORDER=0xf164
Press CTRL-s to save the edit and CTRL-x to finalise. A flash message will show. Keep Zynthian powered up. Reboot the Zynthian via Webconf or Admin menu and keep power up until reboot is finished.

To show @wanthalf 's brilliant touch interface on a V5.1, you will have to make a lot of onfigurations in Webconf.
Beware: The V5 Harware buttons are not working any more after you do this config to activate the onscreen buttons. To make them work again, you will have to revert the Hardware > Wiring > Wiring layout to V5, at the bottom of that page save and reboot, or better change Hardware > Kit back to V5, save and reboot.

  1. In Webconf under Hardware > Kit choose Custom, save, let reboot.

  2. Again ln Webconf under Hardware > Audio > Soundcard choose V5 ADAC, save, but do not yet reboot, even though the screen shows a message requesting it.

  3. In Webconf Hardware > Display > Display choose Waveshare 5 or 7 DSI (inverted), save, but do not yet reboot

  4. In Webconf Hardware > Wiring > Wiring Layout activate Advanced view in the top left corner, let page reload (can be slow sometimes), then choose MCP23017 Encoders V5 Touch, let page reload and adjust the following:
    In the field Encoders A-pins: 108,110,112,114
    In the field Encoders B-pins: 109,111,113,115
    In the field Switches Pins:
    -1,-1,-1,-1,-1,-1,-1,-1,-1,-1,-1,-1,-1,-1,-1,-1,-1,-1,-1,-1,-1,-1,104,105,106,107
    In the field MCP23017 I2C Address: 0x21
    In the field MCP23017 INT-A Pin: WPi-GPIO 0 (pin 11)
    In the field MCP23017 INT-B Pin: WPi-GPIO 2 (pin 13)

  5. At the bottom of the page click Save and now let reboot as requested.

  6. Come back to Hardware > Wiring and check for Customisation Profile showing V5, if not, change to V5 and Save at the bottom of the page and reboot.

  7. In Webconf Interface > UI Options activate Advanced view in the top left corner, let page reload, then under Touch Navigation choose V5 Keypad at left or another option you like, Save, let restart.

2 Likes

So did you create the bootable USB drive just by putting the image on the USB drive with the Raspberry Pi Imager?

Zynthian OS does not boot from USB. (At least it did not in the past and have not tried again.)
Raspberry Pi OS does boot from USB.
Then with Raspberry Pi OS booted, I use the preinstalled Raspberry Pi Imager to flash a Zynthian OS stored on the USB stick (or from a second USB stick) onto the builtin MicroSD. Power down, remove the bootable USB stick and enjoy.

OK, got it. Thanks. So no way to boot directly from USB but there is a way to reflash the SD in case of a crash by going through the Pi OS. That solves my problem of having a (physically) hard to get to SD drive.

Yuo could add a micro keyboard to the setup, like the Korg Monotron slide keyboard.

It works like a pot basically.

Also you could use a small 260p screen, to just show some info, like the patch navigation.

Most stuff would not work with such a small screen. It would need to be rewritten into three pixel tall letters… The you would have space for the keyboard, and also 8-16 small buttons like a Nts2 style sequencer ( and replace the other layout of the keybed with just linear buttons).

Ihad casually posted a Micro-Zynthan thread just minutes ago and someone redirected me here. Btw it’s a frkn work of Art what you’ve done!