Hi.
I am interested in building Zynthian as I would like to buy op-1 but I dont have money to buy one and Zynthian seems to have every feature op-1 has. I have some experience in building and designing things and will get help from local hacklab if I need some.(I need some with CNC part)
Is there full list of features? I only found this partial list.
http://wiki.zynthian.org/index.php/Zynthian_Features
How does sampling happen? Can I record new samples as easily as with op-1? Is it possible to do so from audio in?
My Zynthian would have Korg Nanokeys 2 as keyboard and cnc machined aluminium body. I have not made more accurate plans yet. I have only draw scetch of how I would like my Zynthian to look and where rotary encoders will be. (It will basicaly look just like op-1 but with less buttons)
To cool Raspberry pi I would use pody of Zynthian as a heat sink. I have seen this done before with some other electronic devices and that is why I belive it would work. I know that I would need to use some kind of cable so that I can place Hifiberry somewhere else than on top of Raspberry pi.
If the aluminium body turns out to be too heavy I will make it out of wood. Dont know what wood yet.
I am trying to keep everything as thin as possible. If it will be less than 4cm thick I am happy.
Is there something I should think about before I order Zynthian all but the case kit and start to design body in more detail?
I checked out the OP-1 that you mentioned since wasn’t familiar with it. Boy! It’s a really expensive toy! Almost €1000 for a gadget with minikeys. For the money, you could buy a Macbook, Mainstage & a real Midi keyboard.
Squeezing Zynthian into a low profile keyboard is possible. I imagine that you’ll need to hack the Raspberry PI to remove all of the tall connectors. There are a few projects online where people have done this to build handheld gaming consoles. You may need to do the same for the display & then connect the RPi, soundcard, GPIO board & display with a custom ribbon cable.
The sampler support is to play back samples using the Linux sampler engine. Here is no function to record, edit & map samples. Some users have been using soundcards with audio in with the MOD-UI engine & using it as an input for real time effects (reverbs etc). I don’t see this as a limitation myself. I grew up in the 80s with keyboard & rack-mounted samplers. Editing samples with a tiny display is a real pain! 
Aluminum is good for heatsinking. My Zynthian is in a plastic case with a few airholes & I’ve never had any problems. Aluminum will limit the WiFi range. It depends if WiFi is important for you, but I find it very useful for updating the Zynthian & downloading new soundfonts.
I’d recommend getting the kit without the cover and plugging the system together on the workbench before you start any detailed mechanical design. When you’re flashing the Zynthian & getting it working you’ll get a lot more familiar with the setup & the issues that are discussed in the forum.
And there are lots of people here willing to help you out!
Thank you for reply Andy.
I have not thought about removing any connectors. That is realy good idea. There will be lots of room for batteries. 
Is there any recomendations for soundcard if I want audio input?
Well I must live without ability to record, edit and map samples. I wish there would be such feature some day. Maybe I can but something together someday that does just that. I am not very experienced programmer but I love to learn.
Wifi would be good feature. Now that I have thought about it I think I will go with wood as main building material. Only the top part will be aluminium. Maybe. Now there is vision of all wood synth in my head. I migh go with it. If I go with wood it means that I cannot use cnc machine because it is forbiden to machine wood with my local hacklabs cnc machine. I must go with chisel and hammer. Luckily there is wood working room at hacklab.
Edit. I just found out about audioinjector soundcard I think I will buy one of those.
the op1 is very misunderstood, I had one and I regret selling it, unless you’ve used one you would think it is just a toy
I chose to buy only PCB boards and source components from somewhere else because it is cheaper this way. Also I changed my mind about sound card. Sound card that I will use is Hifiberry. I was going to use audio input for microphone only and I can use usb microphone instead.
I have changed my mind about the layout of potentiometers also and I will add 16 drum pads and extra potentiometers or rotary encoders. I want pads to have aftertouch and velocity sensitivity. I will use force sensor for aftertouch and 2 mini buttons for velocity sensitivity. I will connect all this to Atmega 2560 through few 16-channel analog multiplexer/demultiplexer or maybe I must look into shift registers. I hope that there will not be problems. Atmega will be connected to Raspberry pi with usb. I must look into connecting Atmega to Raspberry pi through GPIO pins. Mechanism of drum pads will be 3d printed untill I can get them machined out of aluminium.
If anyone has better idea how to make drum pads with aftertouch and velocity sentivity please let me know.
I am not sure what wood I will use to construct the body. It needs to be durable as I will be carrying it around. I am thinking about using birch but I am not sure if it is good one to use. It is something that grows lot around here and I thought that it would be nice to use local material.
I live in Finland so if anyone knows any good scandinavian wood for synthetisator please let me know.
The way I will make the body is by chiseling big piece of wood hollow. So big that I can fit mutilated korg nanokey 2, electronics and battery inside it. I probaply cover the hole with plywood or thin wood strips glued together to make bigger piece. I might try aluminium to see how it looks. If it looks better I will keep it that way. I might even try anodizing it if it looks good. Maybe golden or slightly orange. I must choose the color of wood first. Color will be some of these or these colors with glossy finish.
I would like to make all the keys and drum pads out of wood. I hope I can dismantel Korg keyboard so that I can install my own keys made out of wood and maybe some 3d printed parts. I have to look how Korg keys are made. Maybe the keys will be painted with one of second links colors and pody one of first links colors. I might go crazy and buy that “Mandariini 3258” color for body. I already have orange 1.8mm leds for drum pads. These will be mounted inside hole middle of pads and I will cover the hole with some kind of clear glue or epoxy so that it will look nice. I have to try different options and find what is best one to use.
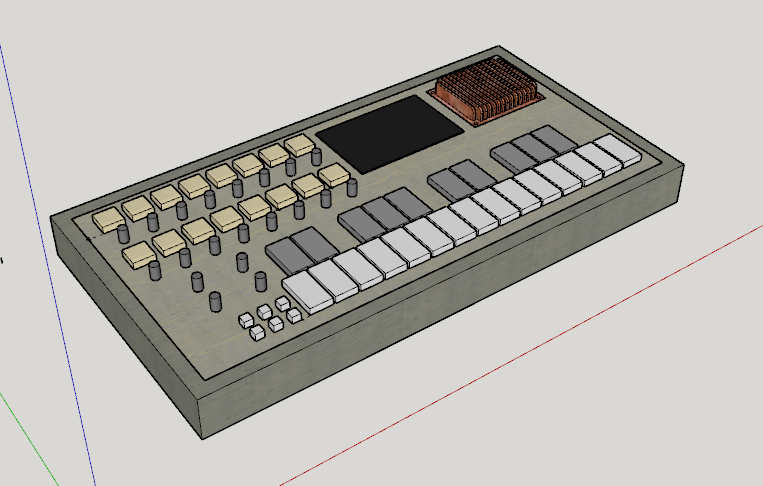
Here is picture of how I want it to look.

Square thing with lines going verticaly at right top corner is heatsink for Raspberry pi. It will be connected to raspberry pi with standoffs and raspberry pi will be connected to body with embedded nuts. On top left there is drum pads. In reality they will be 1,5 x 1,5cm squares 0,5cm apart from each other. Between and under them there will be potentiometers or rotatry encoders. I would like to use rotary encoders with rgb leds but there might be problems because I would have too many inputs and outputs for arduino. In middle ther is screen and rotary encoders around it and at bottom nanokey2.
This wont work easily. Configuring 2 audio devices with jack can be tricky and if you got it, the latency wouldn’t be as good as the latency you get with one single device. Probably you will get more than double of latency.
My advice is that you choose audioinjector if you want an audio input in your Zynthian ![]()
Regards,
Thank you so much for this information. I will buy audioinjector then.
I found this blog post about force sensitive resistors and it seems that I can use only those instead of buttons to make velocity senitive drum pads with aftertouch. This will be so much simpler. I had finished drum pad mechanism design that used 2 buttons for velocity sensitivity. Now I must do it all again. This time it will be much more simpler.
Moi. What kind of wood are you looking for. I’m in finland also.
Moi!  I am looking for something durable and easy to work with. Easines to work with is not as important as durability.
Here is rendering of synthesiser. This is just a crude model of it. Colors will most likely change and it will have glossy finish. I changed placement of encoders again. If it is possible I will make heatshield out of copper. Or not. I must look into which one is better material for that copper or aluminium.
What do you need the heat sink for… My p3 doesn’t get hot
Wood can be available from puukeskus. They have it all there. Where in finland are you… If your near espoo there is a puukeskus there you can get oak or alder and fir and pine and teak… All depends what outcome you want… I’d maybe go for teak though… It’s beaityfull
Keep me updated on your progress as I’m interested making a all in one also
I use heatsink because I dont know any other way to get heat out of the case without making holes to it that are open.
Thanks for info I will check that place as I live in Vantaa. Maybe they know what kind of wood is good for the body.
Edit.
There is no Puukeksus anymore. It fused with Stark 2014. I must check if they have good wood for sale still.
I have found one site that sells curly birch. I think that looks quite good. If I get piece of that wood for good price I will use it as it is best looking wood I have found.
I will definitely go with birch as I can get flame birch and it looks amazing. I’ll try to find some nice color as I am not sure that I want to go with natural color of wood. Maybe green like this.
I will choose color when I am at paint store and see different colors in person not on the computer screen.
I am now thinking which one I will use for knob material, reindeer antler or mammoth bone. I can get piece of mammoth bone that makes 30 knobs for 90€ so it will be 3€/knob. Enough reindeer antlers for knobs would be only 24€. If I buy reindeer antler I could make some nice pattern to them. Something geometric.
It is most likely that I will go with reindeer antler as knob material because of its price.
Edit.
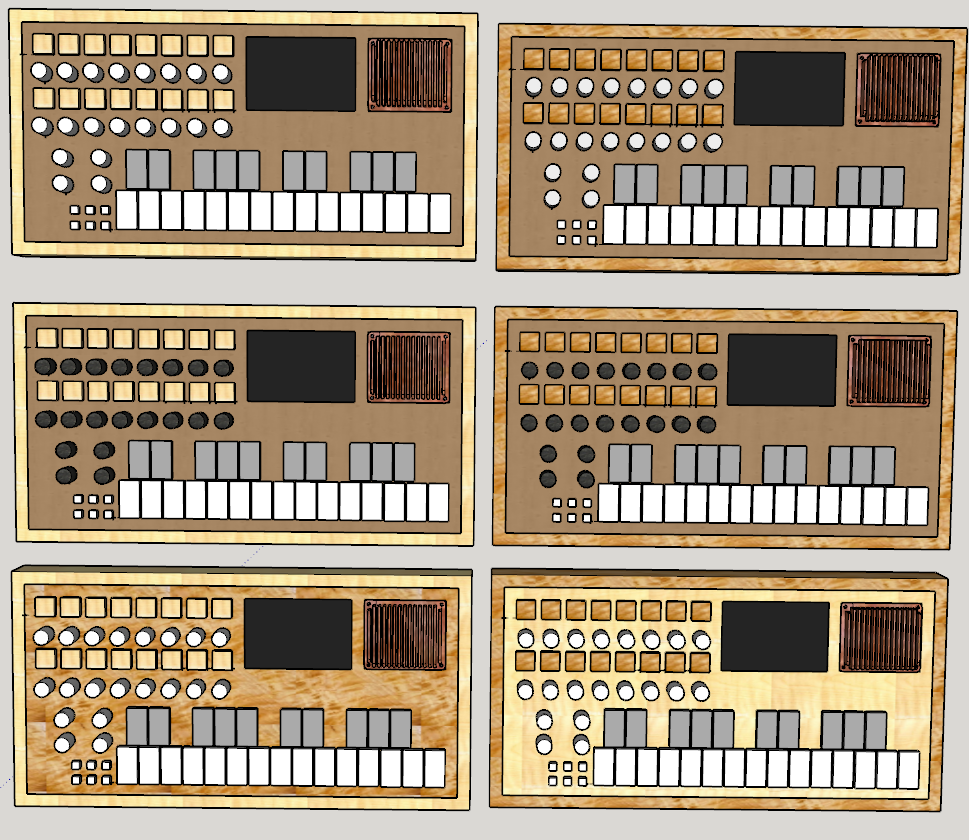
Here is few color schemes that I came up with. I quite like the one on midle right. I may not make keyboard keys out of wood after all as I think grey and white keys look good. Dark grey and white keys look even better. Dark knobs are how it would look like if they are made out of mammoth bone.
what kind of keyboard will you build into it
will you make it op1 style or something else
I will use Korg nanokeys2. You can see how it will look like on pictures above. In beginnnig I was thinking about making it like op-1 clone but I changed my mind. Color will be different. Maybe like in picture bellow but with colored paint that shows pattern of wood in place of that purplish color.


I learned today that there needs to be more interrupt pins so that I could use 16 rotary encoders on atmega1280. 
And there would probaply be too much latency. So the synth will most likely look something like this:

Hi @Aleksi!
Perhaps a teensy could help you. Also, you could consider the possibility of using one or two GPIO expander, like the MCP23017. You get 16 interrupted input ports, grouped in 2 banks and you only consume 2 GPIO pins for IRQ (one for every bank).
Regarding your design, i would recommend to move the 4 zynthian UI encoders to both sides of display, like the original Zynthian design. If you take a look to the Zynthian GUI, you will understand why
BTW, i really love your project and design concept!!
Kind Regards,
Thanks for bringing teensy to my knowledge. I will look into it and GPIO expanders.
I have seen Zynthian GUI and after some thinking I will move 4 zynthian UI encoders where you recommended. I was thinking about that other design because I could take few millimeters off from the width.
With 4 encoders on sides of the screen I am 2mm bellow my max width which is 400mm.
Nice to hear that you like my project and design.