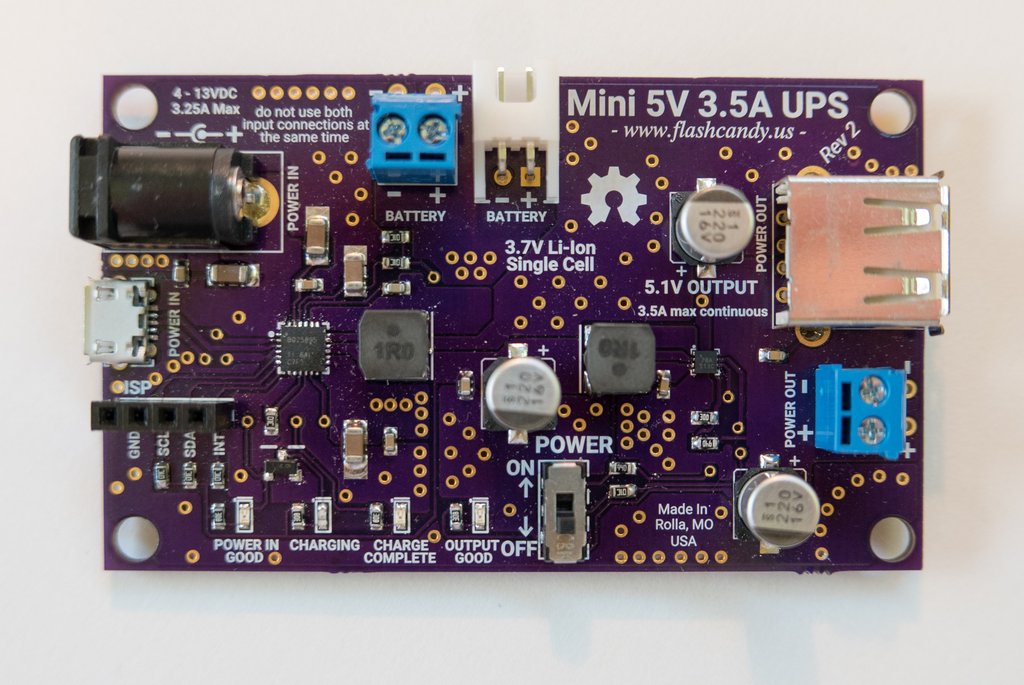
I am thinking about getting one of these for power supply. I just hope that they become available.
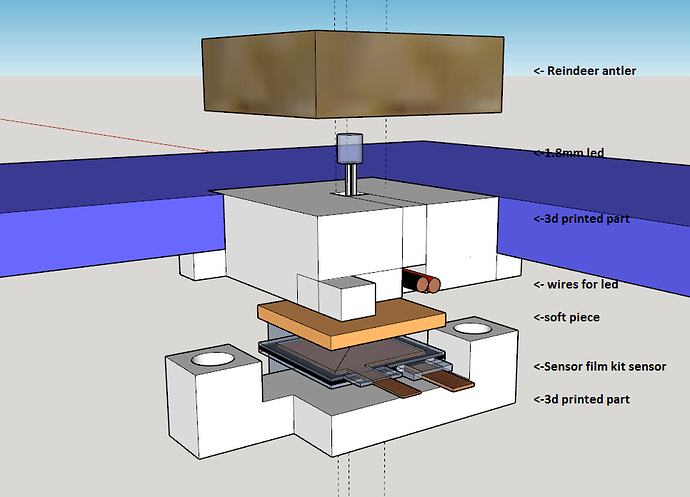
I noticed that I forgot led from drum pad. Here it is with led. Led will be fully inside the 3d printed part when built.
I did look into Teensy and it seems to me that I could do 16 RGB led illuminated rotary encoders, 16 force sensitive resistors and leds inside 16 drum pads with Teensy 3.6.
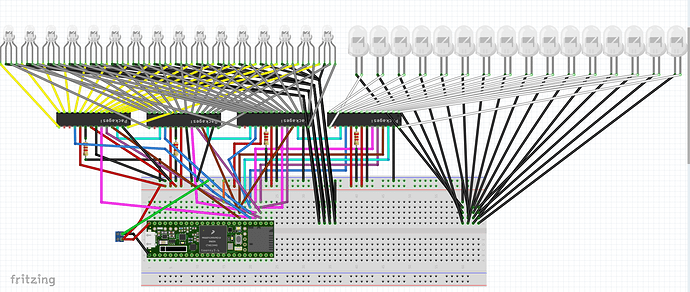
I would need 4 TLC5940 chips (1 chip for 16 led inside drum pads and 1 chip per color of RGB leds) and 2 HC4067 16 channels analog mux/demux(1 for force sensitive reisitors and 1 for push buttons). All leds would be connected to TLC5940 chips and those chips would be connected to Teensy following this. Force sensitive resistors and encoder push buttons would be multiplexed using HC4067. Encoders would be connected to 32 of Teensys digital pins.
Would this work?
Will all these extra options take any cpu resources from the raspberry?
@christianforshaw
Do you mean the leds, knobs and force sensors?
I dont think so as Teensy does the computing and sends midi singals to Raspberry pi. If I get it working 
But I am car mechanic by training so I cannot say for sure.
I did Fritzing schematics of the TLC5940 chips, Teensy 3.6 and leds. Does this seem to be right? I am not sure if orange and green wire is at right place. It is quite a mess but I hope you can read it.
Screw terminal is +5V.
Edit.
I noticed that I forgot to connect BLANK pins to +5V with 10k resistors. Sorry about that. I hope schematic is right otherwise.
1 way to find out if it works… Test it… Where do your source your parts from… Finland or elsewhere.
Also did you thunk about have some softer material for the pads… I know rubber works well
@christianforshaw
I would not want to buy all parts required just to see that it does not work.
I did order some parts from china using ebay, some from https://www.reichelt.de/, PCBs I ordered from here, screen from http://ozzmaker.com/shop/. I have not ordered Teensy if I even are going to use one or Raspberry pi and soundcard. I will get them before end of this year. Wood and reindeer antlers I will buy from http://brisa.fi/.
I have not thought about using soft material. Maybe I should make both soft and hard pads and see which I like more. I have not ever seen any drum pads in real life so I dont know what material they are made of. I always thought that they are made of hard plastic.
ive got a mpc live and had a few mpcs fro akai before ,also korg drum machines etc
every drum machine and sampler ive had the pads are made from rubber, its a nicer feels to hit/ tap a rubber pad then a hard pad
there is also farnell.fi that does electronics
verkkokauppa in Helsinki or online does the raspberrys at an ok price , I got raspberry and hifiberry dac+ from there
I would surgest that you get this combo , raspberry and hifi berry , so it frees up a usb port for you
anway I’m really intrested in this project and wish to see it progress in time
Ok good to know that it is rubber. I will definitely get some silicone and 3d print molds for rubber pads. Maybe I will just make knobs out of reindeer antler not the pads.
What do you mean that hifiberry frees usb port? I dont mind that I have only 3 usb ports and jofemodo recommended that I get audio injector because I want audio input to my Zynthian.
Nice to hear that you are interested.
the hifiberry is connected to the gpio port on the raspberry
I tried my usb sound card , asus , it was bringing up a error and wouldn’t boot the zynthian software
what kind of audio input will you use and what for, will you use it as a sampler also
@christianforshaw
Audio injector is connected to gpio of Raspberry pi also.
Teensy will be connected to Raspberry pi with usb. Teensy is for all the buttons, knobs, pads and leds.
I will use audio input for microphone. I will try samper to see what it can do but it can not record, edit and map sounds to keyboard. I hope that someday I have skills to make program that does that. I will probably record some sounds from normal microphone and contact microphone
My eyes are bleeding after seeing this!! 
Just use WS2812 addressable RGB LEDs. All you need is a single digital output pin, to control color and global brightness of every LED in your project (and drive a couple hundred Xmas lights as a bonus)
Those RGB leds are inside rotary encoders. I dont know if it is possible to change leds inside them.
I think really you could also do without the heatsink, have a bigger display maybe
remember the op1 is a warlord of a machine and doesn’t even get hot
I think the raspberry will do well inside a case like this
Disassembling them to replace internal led can be done for certain encoder models only. You can use an external WS2811 chip for each led, or just put an external WS2812 LED and daisy-chain them, but if I were you I’d avoid those shift registers / led driver like the plague 
@christianforshaw
I have already ordered the ozzmaker screen.
@Axeman
Wow! Thanks for letting me know about those WS2811 chips. I will look into those.
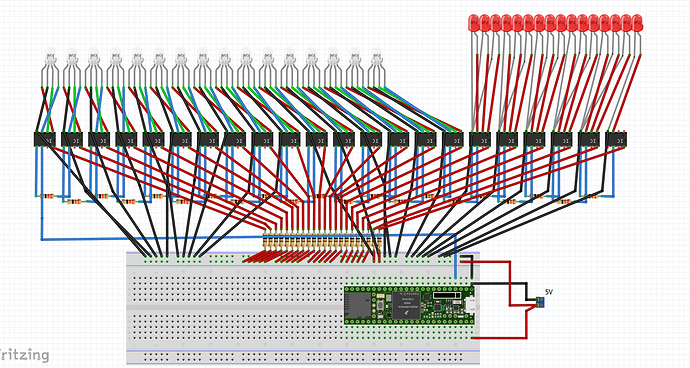
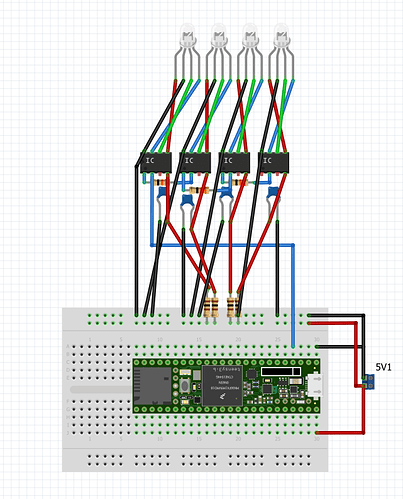
Is this how you use WS2811 chips?
I hope it is because this did take 3 hours of non stop work.
Am I missing 22 bypass capacitors?
I did ask for help at Sparkfuns IRC channel and did receive it very fast. Thanks to Cmdr_data for help.
I did in fact miss the 22 capacitors. Here is right way to connect chips. This example is only piece of whole circuit.
As you can see only difference is that there is capacitors between chips and resistors going to ground.
Sparkfun people are amazing.
For breadboard, your is the way to do that
But in real life, you can assemble (phisically or on PCB) and daisy-chain blocks of LEDs and chips with only +5V, GND, and DATA. Something like this:

(From the official data sheet https://cdn-shop.adafruit.com/datasheets/WS2811.pdf )
BTW, in short chains, with few low power LEDs, you can ditch resistors on DATA line. They’re for limiting reflections, but if your chips are just a few cm apart, reflections are not an issue. You don’t find them in almost all commercially available WS281x LED chains.
